Showing posts with label Painted Cabinets. Show all posts

Monday, February 1, 2021

Country House Progress In The Kitchen

Hi, Dear Friends,
How are you? Thank you for stopping in to see what is going on in the kitchen at our little country house.  
To see where we have been with this house, check out our Country House Page. You will find links to all of the blog posts in this series. I hope you are enjoying our country home journey. 


What do I love in a kitchen? 
White cabinets
Anything vintage
Classic Hardware
Custom carpentry touches 
European flavor 
We're on our way with this kitchen.

I started giving the kitchen my full attention after Christmas. 


We removed a row of uppers and the plastic backsplash the first weekend we were in the house. 
 Bill added new lighting to brighten things up. I added farmhouse inspired accessories. 


I painted the window trim. The curtains came from Walmart. 
I put up a faux tin backsplash behind the sink as it was necessary. You can get faux tin at Home Depot but I had a piece that I thrifted and one that was left over from my mother in law's kitchen. I white washed it for this kitchen. 


I looked at images of kitchens with stained cabinets. 
I loved what I saw on Pinterest but our cabinets were not of that caliber. 


Bill liked them. I thought I could live with them but the kitchen just wasn't me. It was dark. 
I didn't want to paint them because I was sick of painting but I knew it was what needed to be done.  I started painting them a few days after Christmas. I was out at the house alone waiting for our bed. It was the perfect time. 


I worked for 12 hours on Monday. I touched up and did the toe kicks the next day. 
Once the painting was done, the cabinets looked better but they looked unfinished. 
They needed pulls and knobs. 
Collecting these was a challenge. Our covid numbers in Texas are very high so I don't feel comfortable getting out and about but I made a quick trip to Lowes and Home Depot. I didn't stay long enough at either to pick out exactly what I wanted. What I purchased ended up in Bill's bathroom. I need time to stand, look and mull things over but that's not possible right now. 
Hobby Lobby had the cutest vintage inspired knobs but they didn't have enough. They didn't have them on the website either. However, I thought they had that 1930 farmhouse looks so I bought what they had, hoping they would get more. They worked for the large pairs of upper doors and I love them. The pantry got coordinating crystal. The small uppers got a small, white and silver distressed knob. All of them came from Hobby Lobby. 


Ebay came to the rescue with a style of pull for the lower doors. Done!
Cup pulls that I ordered for the drawers were a fail. They were too chunky but there were 11 pulls in the guest house. We have 10 big drawers so I raided the guest house. They coordinate well with the door pulls. 
It's a mystery why the guest house had pulls and the main house did not. 
In all, I was able to get pulls and knobs on every door and drawer. The brushed nickel combined with the crystal have a classic and vintage look. I'm okay that it doesn't all match exactly. There is variation and interest. Don't get me wrong, the placement makes sense.


The tiny junk drawers got some library card catalog inspired pulls that I'd had in my stash but they were oil rubbed bronze. Some silver leaf Rub and Buff took care of the finish. I've had these for years hoping for a place for them. 
It took three weekends to get the pulls and knobs completed but it is finally done.  
As the project was drawing to a close, Hobby Lobby notified me that they got more knobs in stock.
 Ei, Yi, Yi. 


It was time to put some crown molding on top of the cabinets. Bill made quick work of that one Saturday afternoon. The crown molding made such a difference. They went from basic cabinets to higher end look. 
He also cut some cove molding for the floor at the back of the toe kicks. 


I thought that the left side needed a shelf to balance the coffee cabinet on the right. We had the wood left over from something we tore out of my bathroom. The brackets came from Hobby Lobby. For several weeks I'd been thinking about the pendant. It was bugging me. I finally broached the subject with Bill. He didn't like it either. Sometimes it looked like a circle, which we liked. From the other angle it looked like an oval. We didn't like the oval. It was only $7.50 at the Restore so we didn't have a problem picking out something new from Home Depot. The circle/oval fixture is now being used as a garden orb. 

Something was still off. The black brackets offered too much contrast so I painted them. 
White ironstone decorates the shelf. 


With some assistance from Bill, I added some beadboard to the side of the coffee cabinet, the peninsula, and the pantry. Bill overruled my desire for shiplap. The beadboard has the classic, cottage look that we both like. 


I wanted to be able to hang something on the side of the pantry. A towel bar wasn't what I had in mind so Bill made me a replica of a vintage hymnal holder. 


It will be painted or stained this coming weekend. Isn't he amazing? 


Except for one piece of cove molding that got overlooked somehow, we are finished with the kitchen for the time being. Counter tops, a sink and a faucet will be coming at some point. I can't wait. I knew that white cabinets would not coordinate well with the counters but we can live with it until we can get new ones. We'll also be getting a new electric stove so that we can get the propane tank removed. 


That is about it for now. 
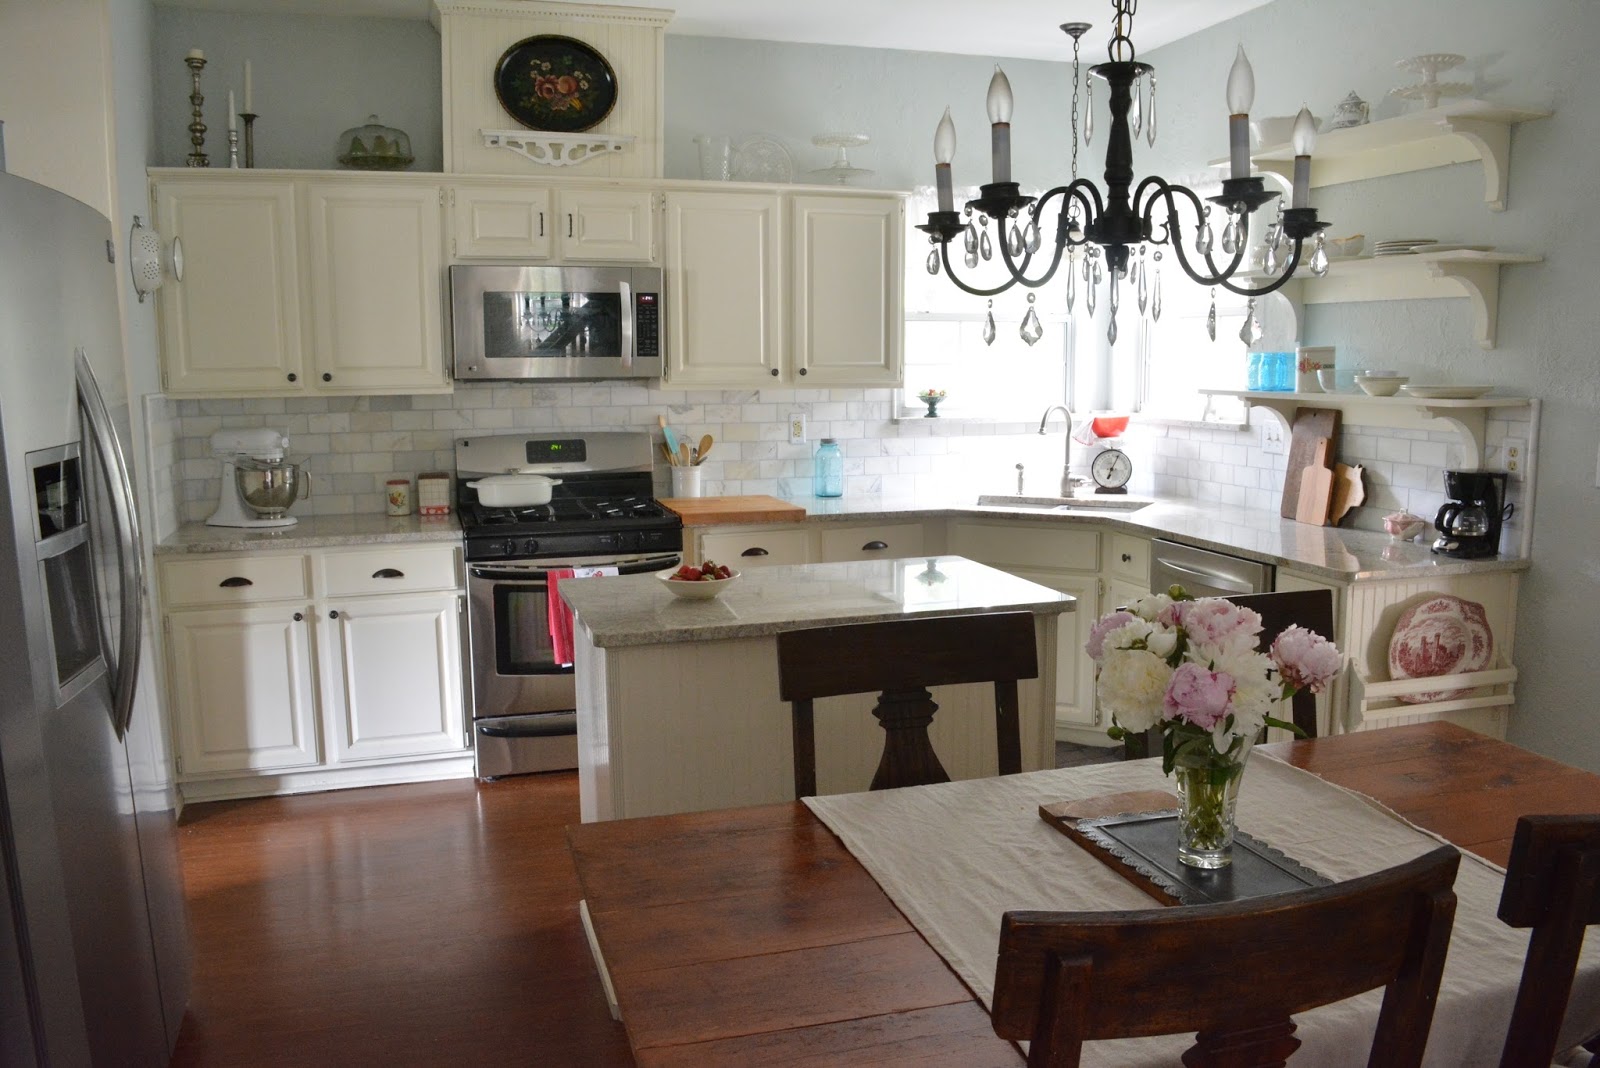
This kitchen has a great layout. It's easy to use and keep clean. We love having the peninsula. 
The white paint has really brightened up the space and offered a look that I love. 
Bill likes it too. The kitchen looks bigger. 
 I'll be working on some brighter photos soon once the sun is out. 
Thanks so much for stopping by. 
Katie 

Saturday, September 17, 2016

Refreshing The Cabinets With Paint

Another title for this post could be, "Repainting Professionally Painted Cabinets."
I wasn't sure how I was going to do this. 


I am a stew-er. 
I mull things over. 
I worry. 
Bill was out of town for a week.
I entertained scenarios in my head about different fates that could lead to his demise. 
Plane crashes, train derailments, and blood sugar issues top the list. 
My son was meeting him there which could mean further train derailments!
It isn't rational since Chris rides the subway on a daily basis... 


I know. 
I'm a sick puppy. 
Bill and a friend had to take "Good Housekeeping" Magazine away from me because we had a new disease each time a new issue came out. 


My answer to keep worry at bay, besides trusting in the Lord, is busy work. 
If I keep busy, busy, busy, then I don't think about all the catastrophic events that could befall my loved ones. 

My kitchen cabinets. 


Can I be honest with you? 
I diligently touched up the paint for about a year after we had them professionally painted. 
After that, not so much. 
Then, I painted the walls white. 


Not a stark white. 
I knew that wouldn't work, but a slightly off white that looked fabulous everywhere else in the house. 
It was terrible. 
The whole room looked sickly yellow like when my babies had jaundice. 
All three of my babies had jaundice. I was a basket case. 

Three months later, I repainted the walls but once that sickly yellow was seen, it could not be unseen.


So a yellowish cast, combined with four years of dings, scratches, and chips and I'd had enough. 
I went to Sherwin Williams with my old paint can, some ideas in my head, and a Pinterest app on my phone. 
I pulled chip after chip of white paint off of the shelf, compared it with the drips on my old paint can and checked my app for gorgeous photos of white cabinets. 

Snowbound in satin finish topped the list.
Snowbound Pro Classic Enamel by Sherwin Williams. 

The sales associate walked me through the necessary prep. 
He suggested sanding (gag) and cleaning with a degreaser. 
Not all the cabinets were greasy. Just the bank by the stove so those are the only ones that got the recommended treatment. 
The rest just got a light cleaning with a wet rag.
  
This paint went on beautifully. 
It dried very quickly for oil based which pleased the socks off of me. 
I did some test spots with a brush. 


I did the rest with a roller and a brush. 
The fastest application involved rolling the paint onto the flat parts of the cabinet doors and then brushing the paint into all the crevices.

There was one repair to do. 


I may have said before that I didn't care for our granite guy. 
Our new stove was not centered with our old counters. 
I asked him to account for the centering of the stove when he measured the template for the granite. 
He didn't do it. 
I wasn't pleased. 
I centered the stove but I had to make a spacer to close the gap between the stove and the cabinet. 
Years of use, the breakdown of the glue, and attaching the spacer did a number to the facing of the cabinet. 

After applying Liquid Nails, I used blocks to lift the sagging facing. 


Since I couldn't clamp this, I countersunk three screws to keep it in place.


I drilled a pilot hole. 


I used a countersink bit so that the screw would not have to sit flush with the facing. 


The cabinet is now secure. 


 I painted with the doors on because that is what the painter did four years ago. 
I wasn't pleased about that because he painted the hinges but it was easier to repaint with them on. 
I left them propped open to dry. 
I also painted with oil based because that is what they used four years ago. 
I wasn't about to go through the necessary steps to prepare these for latex paint.


Oil based paint yellows faster than latex. Satin yellows less than Semi-gloss which is was the old sheen.


Stay out of the kitchen when they are drying because if you bump into one after you have had your shower you will be annoyed when oil based paint gets on your new comfy dress. 
Don't ask me how I know this. 


A project that was supposed to stretch out for a week was done in two days.  

Here are a couple of photos showing the contrast between the old and the new color. 


I'm please with the end result.
My big fear is that I would mess up what the painter did four years ago.  
These cabinets look like they have been resprayed instead of rolled and brushed. 
I'm thrilled. 


I have to hit publish now so I can go play in my bright and fresh kitchen. 


Katie 

Saturday, October 5, 2013

White Kitchen Cabinets

It has been a year since we had the cabinets painted and I have to say that I love my white kitchen. 


The kitchen is so much lighter and brighter.  


Let me tell you, it was worth getting this done.
Bill sort of balked at how much it cost to have painters do this for us but he loves it. 
I knew that I wouldn't get a finish that would hold up over time if I painted these myself. 
 I would also always see the imperfections in a DIY job. 


I have had a few nicks and dings over the course of the year but we have plenty of paint left over for touch ups. 


I was over the 90's look and feel of this space before.
The orange oak color was so dark and dated.


The paint and the appliances updated the room without costing us a fortune. 


Read about how I created display shelves in this post.


I love, love, love having a place to display china in the kitchen.


I finally got the molding installed on the top of my Re-Store find.
I found the small cabinet at the Re-Store for only $25.00 shortly before we painted. 
It adds just a bit of a staggered look to boring builder grade cabinets. 
The painter took it down and painted it as if it were normal to have an added cabinet on top of existing cabinets.


My friend asked what the cabinet was for. 
If I were to get new cabinets today, I would have most of the the cabinetry go all the way to the top but most likely I would have a staggered look and some open shelving.


The little cabinet breaks up a visual line that wrapped around the room at the top of the cabinets, giving the room a little more interest. I am pleased as punch that I was able to cut the molding for this myself. 
I hate cutting mitered corners.


I loved having all the display space above the cabinets 20 years ago. Now I wish I had the extra storage cabinetry would provide. 
I have an idea up my sleeve for the space in the center above the microwave. 
I will let you know if I can get that done. Bill will have to help me with lumber. 


I love my kitchen. 


Katie