
Are
you planning a car trip this summer?
I got to take a road trip to Colorado with my
brother Dave and his wife, Michele.
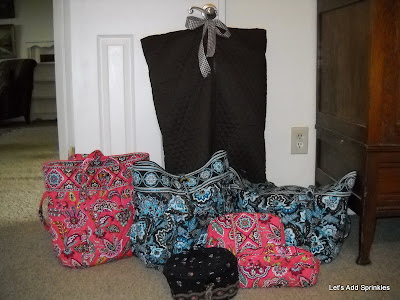
I love pulling out my Vera Bradley bags.
These have been gifted to me over the years.
I had two issues.
My Java Blue is discontinued and
I have enough pieces to get me to the lake for a few days.
I have enough pieces to get me to the lake for a few days.

I didn't want to spend retail for the garment bag even if I could find it.
I made a garment bag way back in the 80's. The country blue and mauve just wasn't working for me anymore.
 But. I figured if I did it once I could do it again.
I got 1 yard of Diamond Double Faced Quilt. It ranges in
price from $9.99 -$19.99. I chose brown and it is 44 inches wide.
Joann Fabrics has sales all the time.
Note: I wish I got 1 1/2 yards I don't know what I was thinking.
I also got the 28 inch Sport separating plastic zipper. for $3.99.
I also got a short spool of coordinating ribbon for the tie.

 Some of my newer pieces are in Color Me Coral. It has also been discontinued.

 Our old luggage starting to disintegrate because we stored it in the attic.
When we get some new luggage, I will try to find brown.


 I love it so much and I didn't take pictures during so I got some black to
make one for Rebekah. I got 4 feet of fabric, I wanted hers a little longer than mine so she could take a dress somewhere.
Lay out the fabric and bring the selvage ends into the center. (The selvage edge is the finished edge on each side. Not the edge cut at the fabric store.)
 You will sew your zipper to each end of the selvage.
 Note the foot in the picture. Nice!

 With the right side in, sew the rest of the seam from the bottom of the zipper to the bottom of the bag.
 Sew along the bottom edge of your garment bag.
 Take a hanger to draw the seam line for the hanger. You will want it angle out from the center following the line of the top of a hanger.

 Trim excess fabric and sew seam closed.
 Turn it inside out and sew a coordinating length of ribbon to the top of the bag. You will use this to secure your hangers to the bag to keep them together.
 Roll the rest of the sleavage edge around the top and hem.
Enjoy your new bag.
 I thought I would get a few Vera Bradley pieces for her to go with this.
 Dork that I am, I sent it home with her already without realizing I didn't get a good picture.
Here is the tutorial again.
 This was not difficult at all if you have some sewing skills.
I hope Rebekah enjoys hers.
A Vera Bradley garment bag currently sells for $130.00. Of course it has all kinds of bells and whistles, but I like these just fine!
If I had it to do over again. I would get as many pieces of Vera Bradley at once. They are discontinuing patterns way to quickly to add it over time like I did.
Anyway...
Wouldn't these be cute to make for bridesmaids to hold their dresses?
How about as a gift for a graduate?
Let me know if you make one.
Happy Travels!
Sprinkled with bags for travel,
Katie
Linking with,
Funky Junk Interiors
My Uncommon Slice of Suburbia
My 1929 Charmer Blog
Craft-O-Maniac Monday

I got 1 yard of Diamond Double Faced Quilt. It ranges in
price from $9.99 -$19.99. I chose brown and it is 44 inches wide.
Joann Fabrics has sales all the time.
Note: I wish I got 1 1/2 yards I don't know what I was thinking.
I also got the 28 inch Sport separating plastic zipper. for $3.99.
I also got a short spool of coordinating ribbon for the tie.

The brown coordinates well with the brown background of Java Blue.


When we get some new luggage, I will try to find brown.


make one for Rebekah. I got 4 feet of fabric, I wanted hers a little longer than mine so she could take a dress somewhere.
Lay out the fabric and bring the selvage ends into the center. (The selvage edge is the finished edge on each side. Not the edge cut at the fabric store.)


Close up of zipper.
I would look on You Tube for a zipper tutorial if you haven't put one in before.


Enjoy your new bag.


Here is the tutorial again.

I hope Rebekah enjoys hers.
A Vera Bradley garment bag currently sells for $130.00. Of course it has all kinds of bells and whistles, but I like these just fine!
If I had it to do over again. I would get as many pieces of Vera Bradley at once. They are discontinuing patterns way to quickly to add it over time like I did.
Anyway...
Wouldn't these be cute to make for bridesmaids to hold their dresses?
How about as a gift for a graduate?
Let me know if you make one.
Happy Travels!
Sprinkled with bags for travel,
Katie
Linking with,
Funky Junk Interiors
My Uncommon Slice of Suburbia
My 1929 Charmer Blog
Craft-O-Maniac Monday
I never realized it would be so simple to custom make a garment bag to coordinate with luggage. This is a great idea! It coordinates so nicely with all your other bags, too.
ReplyDeleteWow, making a custom garment bag seems pretty simple! The fabric you choose does coordinate well with you pieces, and your tutorial now shows us how! So glad you shared your creative inspiration with Sunday’s Best – your creativity helped make the party a success!
ReplyDeleteI saw your tutorial and could't wait to make one of my own!It was simple and quick. I added my initials and a nylon webbing at the bottom so it could be folded in half. I also lined it because I couldn't find double faced quilted fabric. I love it so much!! Thanks for the tutorial!!!!
ReplyDeleteThis comment has been removed by a blog administrator.
ReplyDeleteThanks for the great tutorial. I'm excited to make one for my daughters dance costumes, she'll be so excited to have something unique and special. Thanks!
ReplyDeleteI'm glad that you found it helpful. I have made three of them and they serve me very well.
DeleteTimeless European-inspired architecture marry contempo design and amenities offers its resident a truly
ReplyDeletealluring abode to call home.the interlace condo *theinterlacecondo.sg*